There are a lot of options for data scientists to store data in the Azure cloud. In this blog post I will cover the pros and cons of Azure SQL Server Managed Instance and will provide a few tips so you can hit the ground running if you decide to take it for a test drive.
Overview
Azure SQL Server Managed Instance is a hosted version of the ‘classic’ SQL Server from Microsoft in the Azure cloud that is designed to allow an almost (!) seamless switch from SQL Server installed on-premise. It supports VNET integration, which is a hard requirement at the company I work for.
Some of the most important pros are:
- Allows resizing with the click of a button: You can increase compute power and storage with a few clicks
- No patching or management of the underlying infrastructure is required
- Almost full feature parity with ‘classic’ SQL Server
- License is included price and there is an option to get significant savings if you qualify for Azure Hybrid Pricing
However, there are some shortcomings:
- Compared to alternatives such as MariaDB and Postgres the price is still quite high
- No support for Polybase, a service that allows you to map files from Azure Blob or Datalake etc into your database as external tables
- No full feature parity to ‘classic’ SQL Server. Check out this link for a full comparison of feature availability.
The lack of Polybase support was a bit of a bummer for our team. We wanted to store old tables cheaply in Azure Blob storage and map them into our SQL Managed Instance, but that is not possible at the moment.
Still, the ability to easily scale our server was a huge plus so we decided to give it a go.
In the next sections I want to give you a few tips on how to work with SQL Server Managed Instance.
Authentication
You need to specify an Active Directory admin user in the Azure portal. Azure Active Directory authentication requires database users to be created as contained db users, which means that the user does not have a login in the master database. To create a new contained database user, you need at least ALTER ANY USER permissions and run the following code:
CREATE USER <AD-USER-NAME> FROM EXTERNAL PROVIDER;
Don’t forget to assign your new user appropriate permissions after creation:
GRANT <permission> ON <object> TO <user>
Unlike in ‘classic’ SQL Server you do not need to create a separate database login to allow access to the server since access is handled by AAD.
Connecting
In this section I want to briefly cover how to connect to your Managed Instance (MI) using ODBC, ADO.NET, SSMS and SSMS with linked server.
SSMS
Since MI relies on Azure Active Directory you need to upgrade SSMS to version 17.9 or higher. After you upgraded, you will see a new authentication option called Active Directory: integrated. Just select this option instead of Windows-Authentication and you are ready to go:)
Linked Server
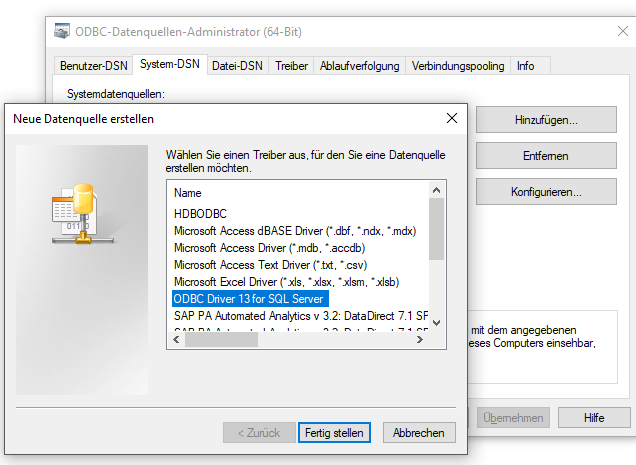
Before we can create a linked server in SSMS, we are going to create an ODBC connection profile. On Windows 10, simply search for ODBC Data Source Administrator or ODBC Datenquellen einrichten (64bit) with German language settings. Launch the program with your admin account.
Note: If you create a 64bit ODBC profile you also have to use the 64bit SQL Import/Export Wizard!
After launching the wizard you need to add a connection profile on the System-DSN tab and select the ODBC Driver for SQL Server.
If you do not see the ODBC Driver listed here, you need to head to Microsoft’s download center to install it first. Then you simply need to follow the setup wizard.
Important: Jot down the name of your profile somewhere, we are going to need that later to reference the connection.
When the wizard asks you how you want to authenticate with your database, select With integrated Active Directory Authentication and that is it. You can also specify a default database to connect to.
Now head over to SSMS and connect to the server where you want to add the managed instance as a linked server.
- In the Database View window select
Serverobjects - Right-click
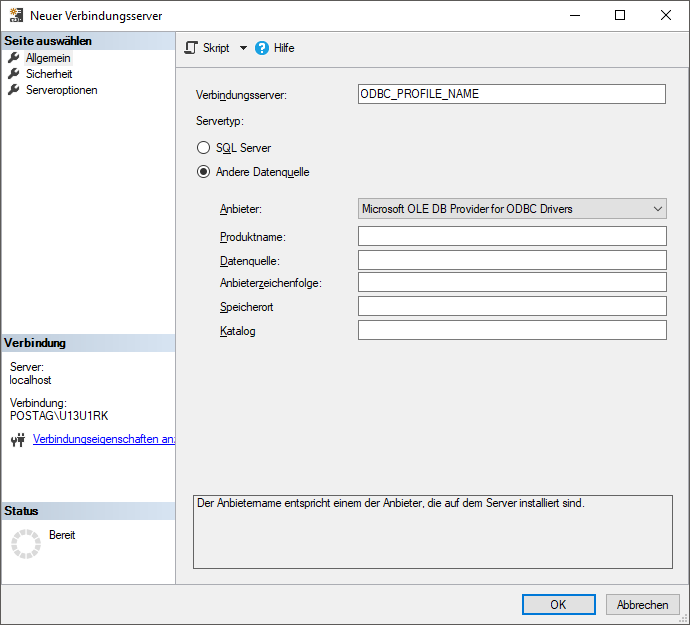
Linked-Serverand add a new server - Enter the name of your connection profile in the
Linked Serverbox:
- Select
Microsoft OLE DB Provider for ODBC Driver - Head to
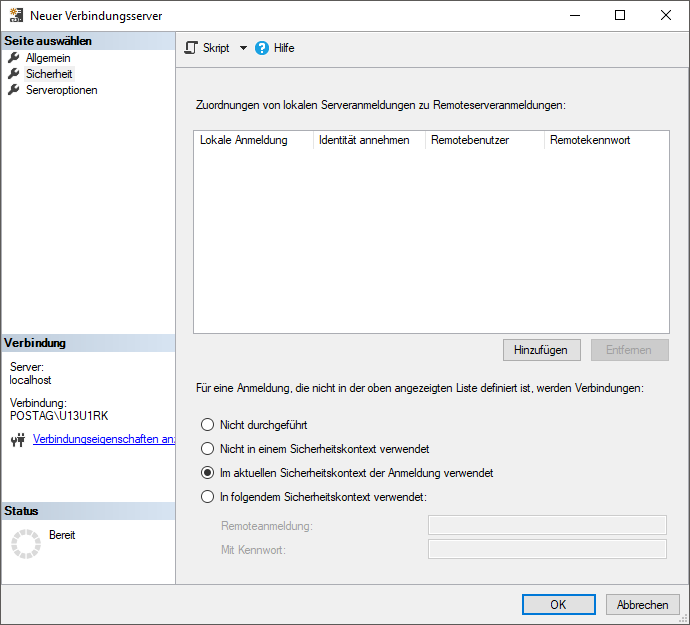
Securityand select to use the security context of the current user (this is important, because otherwise you would need to grant your admin user access to MI as well and login as admin everytime to use AD authentication, which is a pain and a security bad practice:)
Now you can simply query your linked server using:
SELECT TOP 10 *
FROM <LINKED_SERVER_NAME>.<LINKED_SERVER_DB>.<LINKED_SERVER_TABLE>
and use it for example with your local database:)
ODBC
To connect using ODBC using R (with DBI) or Python (using pyodbc) simply use the following connection string (removing \ at line end in R):
con_string_py = 'DRIVER={ODBC Driver 13 for SQL Server}; \
                 SERVER=<server_address>; \
                 DATABASE=<db_name>;
                 TimeOut = 30; \
                 Authentication=ActiveDirectoryIntegrated'
ADO.NET
I experienced some issues using ODBC, mostly in connection with specific datetime types. For that reason, I usually use ADO.NET with the SQL Import/Export Wizard (see below).
The ADO.NET connection string is:
    Server=tcp:<your-server-name>.database.windows.net,1433;
    Persist Security Info=False;
    Initial Catalog=<your-database>;
    MultipleActiveResultSets=False;
    Encrypt=True;
    TrustServerCertificate=False;
    Authentication="Active Directory Integrated";
Import/export data
Sometimes we want to quickly import/export some data from our MI. One way to do this is to use the linked server we created above.
To import data from MI to your local database you can simply run:
SELECT TOP 10 *
INTO <LOCAL_SERVER_TABLE>
FROM <LINKED_SERVER_NAME>.<LINKED_SERVER_DB>.<LINKED_SERVER_TABLE>
To export data from your local database to MI using linked server you first need to create the table on MI and then you can insert into your table using:
INSERT INTO <MI_TABLE>
SELECT TOP 10 *
FROM <LOCAL_SERVER_TABLE>
Alternatively, we can simply use the SQL Import/Export Wizard. Note that you need to run the 64bit Wizard if you created a 64bit ODBC connection profile. By default, SSMS (32bit) launches the 32bit Wizard if you click Task > Import/Export Data.
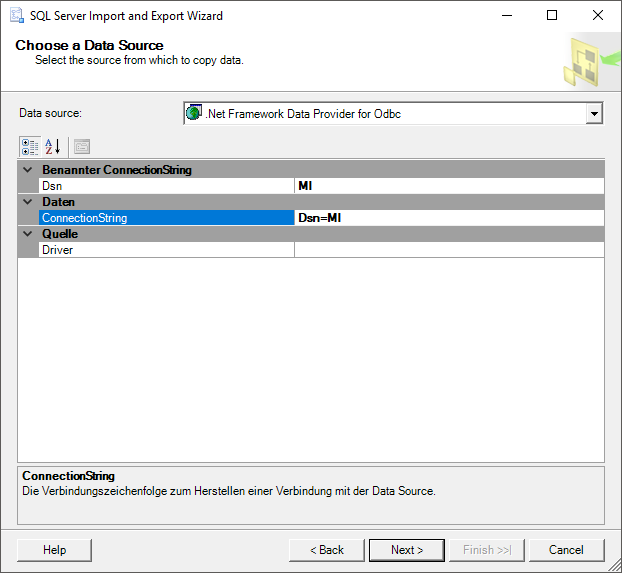
In the Wizard simply specify the following:
where DSN (=Data Source Name) is the name of your ODBC connection profile. You can then simply paste the ODBC connection string (without the \ ) in the connection field box and you are done:) Thx to my colleague Martin here for helping me figure out that just specifying the DSN is not enough:)
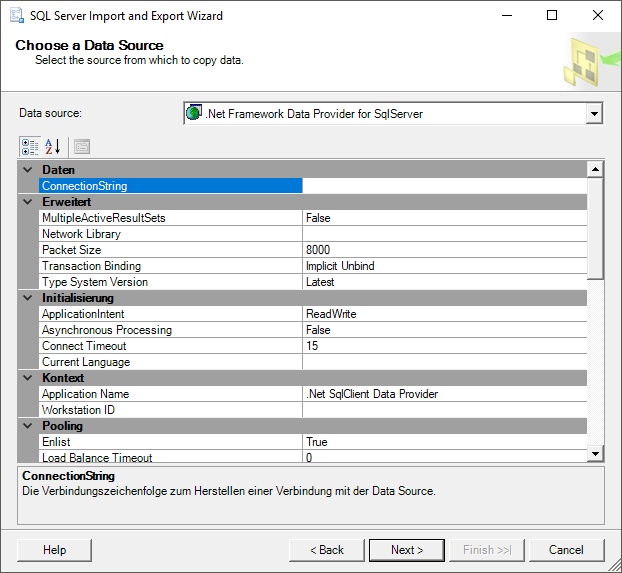
My prefered way to connect to our MI is using ADO.NET by selecting .Net Framework Data Provider for SqlServer in the Wizard:
This avoids many troubles with column type conversions and works more smoothly in general.
I hope you found this post helpful!
